How to connect to AWS RDS using SSM and IAM
— DevOps — 11 min read
Requirements
The list of AWS services we will be using for this setup are:
- RDS
- IAM
- Systems Manager (Sessions Manager)
- EC2
The list of software required is as follows:
- AWS CLI v2
- Sessions Manager Plugin for AWS CLI
- *nix shell (like Bash/zsh)
Everything in this blog post has been done using the AWS Free Tier.
Setting up the Infrastructure
My region is "us-east-2" (Ohio). Please be sure to change all "us-east-2" in the IAM Roles and Policies that follow your specific region.
Security Groups
-
Name: "bastion-sg"
Description: "Allows Bastion Host access from anywhere"
| Description | Inbound Port | Inbound Source |
|---|---|---|
| Allows SSM from Anywhere | 443 | 0.0.0.0/0 |
| Allows RDS Connection | 5432 | rds-connect-sg (from next step) |
| Description | Outbound Port | Outbound Source |
|---|---|---|
| Allows Outbound to Anywhere | All | 0.0.0.0/0 |
-
Name: "rds-connect-sg"
Description: "Allows RDS connection from Bastion Host"
| Description | Inbound Port | Inbound Source |
|---|---|---|
| Allows RDS Connection | All | bastion-sg (from previous step) |
| Description | Outbound Port | Outbound Source |
|---|---|---|
| Allows RDS Connection | All | bastion-sg (from previous step) |
RDS
In this blog, we will be using RDS Postgres. It doesn't matter if it is Aurora or not.
A few configuration changes to keep in mind:
- Connectivity > "Don't connect to an EC2 compute resource"
- Connectivity > Public Access > "No"
- Connectivity > Existing VPC security groups > "rds-connect-sg"
- Database Authentication > "Password and IAM database authentication"
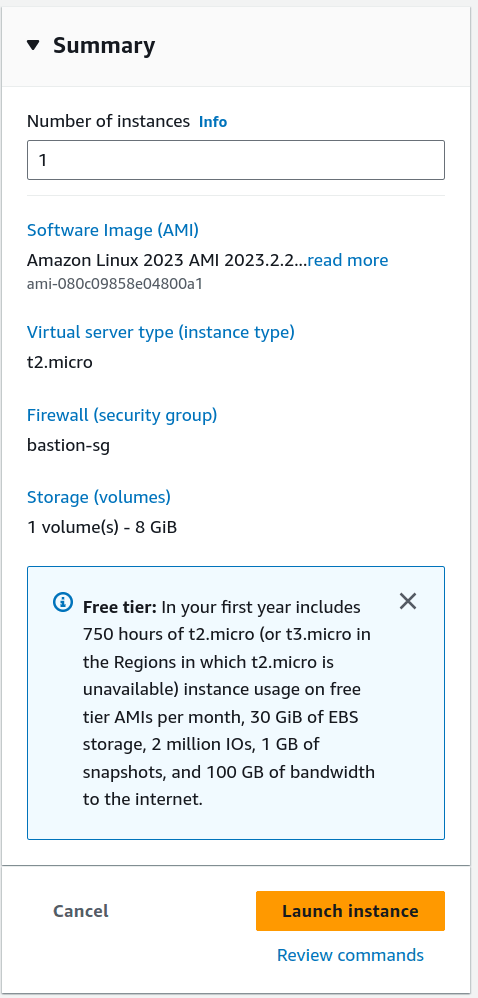
EC2
Since we are using the Free Tier, here is my configuration:
- Instance size: t2.micro
- AMI: Amazon Linux
- Key Pair (login) > Don't create any pair
- Network Settings > "Select existing security group" > "bastion-sg"
Step 1: Setup IAM Policies and Roles
- Create Policy
Name: ssm-bastion-host
Description: Allow SSM access to Bastion Host
{ "Version": "2012-10-17", "Statement": [ { "Sid": "VisualEditor1", "Effect": "Allow", "Action": "ssm:StartSession", "Resource": [ "arn:aws:ec2:us-east-2:<aws account id>:instance/<ec2 instance id>", "arn:aws:ssm:*::document/*" ], "Condition": { "BoolIfExists": { "aws:MultiFactorAuthPresent": "true" } } } ]}The instance ID looks something like i-... and is visible under the "Instance ID" column on the EC2 page.
- Create Role
Name: ssm-rds-role
Description: Allow RDS access via SSM
Create Role > "Custom trust policy" >
{ "Version": "2012-10-17", "Statement": [ { "Effect": "Allow", "Principal": { "Service": "ec2.amazonaws.com" }, "Action": "sts:AssumeRole" } ]}Permissions:
- AmazonSSMManagedInstanceCore (it's a managed policy)
- ssm-bastion-host (which we just created in the step before)
Now attach this role to the bastion-host EC2 instance. To do so:
- Navigate to EC2 page
- Select the Bastion Host EC2 instance
- Select "Actions" on the top-right
- Navigate "Security" > "Modify IAM Role"
- Select the IAM role created in this step
Note: Sometimes you may be unable to find the IAM role in Step 5. To resolve this, create the "Trust Relationship" using GUI only. (While creating the role, on the "Select trusted entity", choose "AWS service"; and under "Use case", select "EC2".)
Lastly, we will create policies for our 2 developer roles.
- Create Policy
Name: db-name-dev_ro
Description: RDS IAM Authentication to dev_ro user
{ "Version": "2012-10-17", "Statement": [ { "Sid": "MainRDS", "Effect": "Allow", "Action": "rds-db:connect", "Resource": [ "arn:aws:rds-db:us-east-2:<aws account id>:dbuser:<rds resource id>/dev_ro" ], "Condition": { "BoolIfExists": { "aws:MultiFactorAuthPresent": "true" } } } ]}The "rds resource id" can be found under the "Configuration" tab, under the heading "Resource id". For an RDS instance, it looks like "db-...".
Similarly, make the same policy but replace "dev_ro" with "dev_rw".
- Create Policy
Name: db-name-dev_rw
Description: RDS IAM Authentication to dev_rw user
{ "Version": "2012-10-17", "Statement": [ { "Sid": "MainRDS", "Effect": "Allow", "Action": "rds-db:connect", "Resource": [ "arn:aws:rds-db:us-east-2:<aws account id>:dbuser:<rds resource id>/dev_rw" ], "Condition": { "BoolIfExists": { "aws:MultiFactorAuthPresent": "true" } } } ]}And not to forget the superuser policy...
- Create Policy
Name: db-name-su
Description: RDS IAM Authentication to superuser
{ "Version": "2012-10-17", "Statement": [ { "Sid": "VisualEditor0", "Effect": "Allow", "Action": "rds-db:connect", "Resource": "arn:aws:rds-db:us-east-2:<aws account id>:dbuser:<rds resource id>/<rds superuser name>", "Condition": { "BoolIfExists": { "aws:MultiFactorAuthPresent": "true" } } } ]}Note: If you are using an RDS cluster, you should use the "Resource ID" from the "Configuration" tab of the cluster instead of the instance. For a cluster, it looks like "cluster-...".
Step 2: Installing Socat on Bastion Host EC2
What does Socat do?
To quote Socat documentation:
Socat (for SOcket CAT) establishes two bidirectional byte streams and transfers data between them. Data channels may be files, pipes, devices (terminal or modem, etc.), or sockets (Unix, IPv4, IPv6, raw, UDP, TCP, SSL).
With Socat, we will forward SSM's start-session connections to RDS using the password generated through the AWS CLI. This will allow you to have an "n" number of connections to your database through the same port, thereby allowing multiple people to connect to the database simultaneously.
To install Socat:
- Connect to EC2 using Sessions Manager
- Run
sudo yum install -y socat - To check if socat has been installed, run
socat -V
Now let's configure Socat so that it can perform the bidirectional connection:
-
Connect to EC2 using Sessions Manager
-
Run the following command:
cat > start-socat.sh << EOF#!/bin/shRDS_INSTANCE=<YOUR RDS URL>LISTEN=5432 # Assuming the RDS Port is 5432sudo socat TCP-LISTEN:\$LISTEN,reuseaddr,fork, TCP4:\$RDS_INSTANCE:5432EOFThis will create a
start-socat.shfile which you have to run. Please don't forget to put the value in for the "RDS_INSTANCE" variable -
Change file permissions to allow executing it with
chmod +x start-socat.sh -
To try if socat is working, run it with
./start-socat.sh
To keep socat running without a terminal, we will use the "nohup" command. To quote its documentation:
Nohup, short for "no hang up" is a command in Linux systems that keeps processes running even after exiting the shell or terminal.
To have the script running without the terminal, run the following command:
nohup start-socat.sh &> socat.logThis will redirect whatever socat is outputting into a file called "socat.log".
Just remember that, if you restart the bastion host, you will have to execute this "nohup" command again.
To check if socat is running in the background, run ps aux | grep socat. This will show you all the socat commands which are running on the system. Running it should output something like this:

Step 3: Create IAM users on RDS
The next 2 sections pertain to your AWS IAM Console.
Create a new IAM user and Set up Access Keys locally
- Create Access Keys for your user using IAM
- Navigate to the "IAM" page on AWS Console
- Click on "Users" on the left-hand menu panel
- Click on "Create user" and type in some username
- Attach the "db-name-su" and "db-name-ro" policies
- Click on "Create user" to finish creating this user
- Click on the username you just created
- In the "Summary" section, click on "Create access key"
- Select the "Command Line Interface (CLI)" option and click "Next"
- Download the ".csv" file to know your credentials
- Download AWS CLI. This is used to create a connection to your EC2 from your local terminal.
- Download Sessions-Manager-Plugin . This plugin is required to establish a "Sessions Manager" connection.
- Set up AWS CLI to use your Access Keys from Step 1. Read this guide.
Attaching RDS Connect policies to the new IAM User
- Navigate to IAM Console and select the user you just created
- In the "Permissions" tab, on the top right, select "Add permissions" > "Add permissions"
- Select "Attach policies directly"
- Search for and select the following policies - "db-name-dev_ro" and "db-name-su"
- We will leave out "db-name-dev_rw" for later
- Additionally, attach the AWS Managed policy "AmazonSSMFullAccess" to connect to EC2 via SSM.
- Click "Next" on the bottom of the page, and finally click on "Add Permissions".
Generate RDS IAM Password and connect to your Database
For this section, I recommend installing some Database IDE like Dbeaver or Datagrip as it makes things easier. I will be using Dbeaver.
Now back to your local terminal...
To generate the AWS database authentication token for RDS, use the following command:
aws rds generate-db-auth-token --hostname $PGHOST --port $PGPORT --username $PGUSEROpen a new terminal, and substitute:
- "PGHOST" with your RDS URL
- "PGPORT" with your RDS port
- "PGUSER" with your RDS master user
It should output some long string in the format of:
<PGHOST>:<PGPORT>/?Action=connect&DBUser=<PGUSER>&X-Amz-Algorithm=AWS4-HMAC-SHA256&X-Amz-Credential=<Access Key ID>%2F<Region>%2Frds-db%2Faws4_request&X-Amz-Date=<Request Timestamp>&X-Amz-Expires=900&X-Amz-SignedHeaders=host&X-Amz-Signature=<Long Key>This password expires after 15 minutes or 900 seconds ("X-Amz-Expires" parameter), after which you will have to re-run the same command to re-generate a new one.
And finally in another new terminal, to connect to your RDS instance through the Bastion Host using SSM, run the following command in your terminal:
aws ssm start-session --target $BASTION_HOST_INSTANCE_ID --document-name AWS-StartPortForwardingSession --parameters '{"portNumber":["5432"],"localPortNumber":["5433"]}'The "BASTION_HOST_INSTANCE_ID" is the "Instance ID" of the EC2 instance, and it starts with "i-...".
The output should look something like this:

At this point, you should be able to connect to your RDS instance.
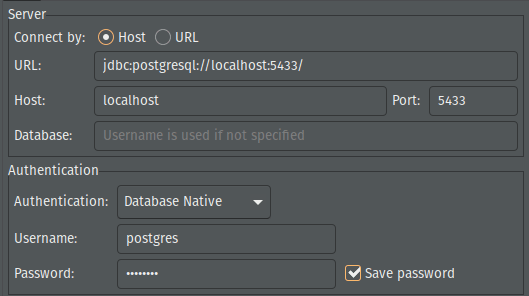
- Create a Connection
- Hostname: localhost
- Port: 5433
- Username: (use master username)
- Password: (use master password)
- Create Postgres users and roles
The following script is a summary of the AWS article - Managing Postgres users and roles.
In a new SQL console, execute the following script.
-- Read-only roleCREATE ROLE readonly;GRANT CONNECT ON DATABASE postgres TO readonly;GRANT USAGE ON SCHEMA public TO readonly;GRANT SELECT ON ALL TABLES IN SCHEMA public TO readonly;ALTER DEFAULT PRIVILEGES IN SCHEMA public GRANT SELECT ON TABLES TO readonly;
-- Read/write roleCREATE ROLE readwrite;GRANT CONNECT ON DATABASE postgres TO readwrite;GRANT USAGE, CREATE ON SCHEMA public TO readwrite;GRANT SELECT, INSERT, UPDATE, DELETE, TRUNCATE ON ALL TABLES IN SCHEMA public TO readwrite;ALTER DEFAULT PRIVILEGES IN SCHEMA public GRANT SELECT, INSERT, UPDATE, DELETE ON TABLES TO readwrite;GRANT USAGE ON ALL SEQUENCES IN SCHEMA public TO readwrite;ALTER DEFAULT PRIVILEGES IN SCHEMA public GRANT USAGE ON SEQUENCES TO readwrite;
-- grant rolesCREATE USER dev_ro WITH LOGIN; CREATE USER dev_rw WITH LOGIN; GRANT readonly TO dev_ro;GRANT readwrite TO dev_rw;
-- grant rds_iam roleGRANT rds_iam to dev_ro;GRANT rds_iam to dev_rwTo summarise the script, this SQL script simply creates readwrite and readonly roles and assigns them to users dev_ro and dev_rw. It also grants the rds_iam role which is necessary for the db-generate-auth-token command. The master user has this role granted to it on database server creation time.
Note: This script is very specific to Postgres and will not work for other database engines.
Step 4: Testing it all together
To test if we can log in as the dev_rw user locally, and if it is indeed a "readwrite" user.
- Run
aws rds generate-db-auth-token --hostname $PGHOST --port $PGPORT --username dev_rwwith same PGHOST and PGPORT as before. - Create a new connection in DBeaver, the Username should be "dev_rw" and don't save the password.
- This connection should fail with an error "PAM authentication failed for user: dev_rw"
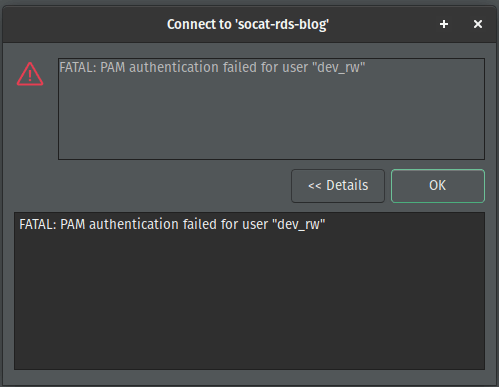
- This is because we haven't attached the "db-name-dev_rw" policy to our user
- Now go back to the IAM Console and add this policy to the user, and proceed with the next step.
- This connection should fail with an error "PAM authentication failed for user: dev_rw"
- In the "postgres" database, try:
CREATE TABLE people (firstname VARCHAR(255), lastname VARCHAR(255));and it should return success.SELECT * from people;and it should work (albeit returning no results).
Next up, to test if we can log in as the dev_ro user locally, and if it is indeed a "readonly" user.
- Run
aws rds generate-db-auth-token --hostname $PGHOST --port $PGPORT --username dev_rowith same PGHOST and PGPORT as before. - Create a new connection in DBeaver, the Username should be "dev_ro" and don't save the password.
- In the "postgres" database, try:
CREATE TABLE cars (brand VARCHAR(255), model VARCHAR(255), year INT);and it should throw an error - "SQL Error [42501]: ERROR: permission denied for schema public"SELECT * from people;and it should work (albeit returning no results).
Conclusion
In this blog, we used a Bastion Host (EC2 instance) in a public subnet as a bridge between your local machine and an RDS instance in the private subnet.
We control read/write access to RDS using IAM policies through "db-name-dev_ro" and "db-name-dev_rw" policies which you can either directly attach to a single user, or to a group of users using the IAM "User groups".
For emergency scenarios, you can grant the "db-name-su" to your Administrator for debugging purposes.